


To repair a paddle board, it’s essential to first assess the damage and prepare the necessary equipment and materials. The repair process varies based on the type of damage and the material of the board. For inflatable boards, use PVC patches and glue for leaks. For fiberglass boards with foam cores, sand the area, apply epoxy resin, and cover with fiberglass cloth. Plastic SUP boards may require special plastic putty for filling cracks. Ensure proper curing and sealing of the repairs and maintain regular board maintenance to prevent future damage.
Most leaks are not holes in the skin. A valve works loose, a seam lets air past under pressure, or a fitting has been over-tightened, and the board goes soft overnight without a single visible mark on it.
So the first job is finding the leak, not patching it. Below is the sequence: locate the damage, match the repair to the material the board is made of, and give the adhesive the curing time it actually needs before the next inflation.
- Assess the damage to apply the correct repair method.
- Use material-specific techniques for effective repairs.
- Allow adequate time for the repair to dry and cure.

Assessing Damage and Preparing for Repair

Before you set out to repair your paddle board, it is crucial to accurately assess the damage and prepare the necessary equipment and materials.
Doing so will ensure a smooth and effective repair process.
Identify the Type of Damage
The first step is to determine the nature of the damage to your paddle board.
For inflatable boards, look for punctures, cuts, or seams that have come apart.
Punctures or dings in hard boards should be carefully inspected.
If you’re dealing with a ding, it’s important to locate the leak by using water.
Submerge the damaged area or pour water over it and look for bubbles that indicate escaping air.
It’s imperative to know whether it’s a simple scratch or something that compromises the board’s integrity.
Gather Necessary Repair Materials
Once you’ve established the extent and type of damage, gather the materials you’ll need for the repair.
For most repairs, you’ll need:
- Repair kit: Usually includes patches, glue, and sometimes a wrench or screwdriver.
- Cleaning supplies: Use acetone or soapy water to remove grime and debris from the damaged area.
- Equipment: Have a hairdryer or heat gun ready to help with adhesive application.
Ensure that the board is dry and clean before attempting any repairs.
Follow the instructions provided with your repair kit closely, as different types of damage and boards require specific approaches.

Check here our reviews of the best SUP repair kits
Repair Techniques for Different Materials
Each type of paddle board material requires a specific approach to repair.
From inflatable boards that often need patching to hard boards that can suffer from cracks and dents, understanding the right technique and materials is crucial to a successful repair.
Inflatable Paddle Board Repair
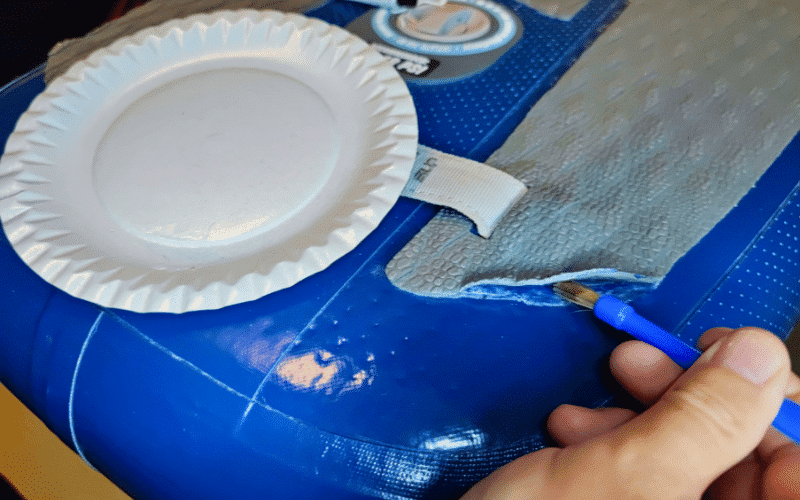
If your inflatable paddle board has a leak, you will need a PVC patch and glue specifically designed for inflatable SUPs.
Begin by locating the leak, then clean the area with rubbing alcohol.
Apply the glue to the back of the PVC patch and the board, wait for it to become tacky, and then press the patch firmly over the leak.
Allow it to cure fully before inflating the board again.

Check here our reviews of the best SUP PVC glue
Fiberglass and Foam Core Repair
For a paddle board made of fiberglass with a foam core that has suffered dings or minor cracks, the repair process involves more steps.
Use 220 grit sandpaper to scuff the damaged area and surrounding surface.
Clean it with acetone to remove any oils and allow for better adhesion.
Once the area is prepped, mix epoxy resin with a hardener, apply over the damage, and cover with a piece of fiberglass cloth.
Sand the hardened resin until smooth and finish with a repair sealant or paint to match the board’s color.
Plastic SUP Boards
Repairing a plastic stand up paddle board typically involves filling cracks or dents with a special plastic putty.
First, clean the damaged area with soapy water to remove debris.
Apply the putty, ensuring it is pressed into any crevices. Once set, sand the area until it is flush with the board’s surface.
In some cases, heat may be applied to reshape or mend the plastic, but this should be done cautiously to prevent warping or further damage.
Table: Which Repair Fits Which Damage
Most repairs fail because the wrong material went onto the damage, not because the paddler lacked skill. This table pairs the two, with the waiting time you have to plan for and the point at which the job stops being a driveway job.
| Damage | Board type | What fixes it | Curing time | Call a pro when |
|---|---|---|---|---|
| Pinhole or small puncture | Inflatable | PVC patch plus vinyl cement (HH-66 type) | 24 hours before inflating | the hole sits on a seam or under the deck pad |
| Seam separation | Inflatable | Seam tape or a patch that laps 2″ (5 cm) past the split on both sides | 24 to 48 hours | the split is longer than 4″ (10 cm) |
| Leaking valve | Inflatable | Valve wrench, quarter turn to tighten, replace the O-ring | none, test immediately | the valve body itself turns in the drop stitch |
| Ding or crack | Fiberglass or epoxy hard board | Sand with 220 grit, epoxy resin plus glass cloth, or UV cure resin | 20 minutes in sun for UV resin, 6 to 12 hours for epoxy | the foam core underneath is wet |
| Crack or dent | Plastic (polyethylene) | Plastic putty or plastic welding | 2 to 6 hours | the crack runs through a fitting or the hull is deformed |
| Loose or torn deck pad | Any | Contact adhesive, weighted down flat overnight | 12 hours | the pad has taken the top layer of the board with it |
| Broken fin box | Any | Not a home repair on most boards | not applicable | always, the box is structural |
Finding a Leak You Cannot See
A board that goes soft overnight but shows nothing under water is usually losing air at the valve, not through the skin. Work in this order and you will find almost every slow leak in under half an hour.
- Inflate to full pressure and leave the board in the shade for an hour. Air pressure drops on its own when a warm board cools, which fools a lot of people into hunting a leak that does not exist.
- Mix washing up liquid with water and brush it over the valve first. Foam at the valve means a quarter turn with the valve wrench that came with the board, or a new O-ring.
- Then brush the seams, the D-rings and the fin box, in that order. Those three account for most leaks that are not the valve.
- Only then do the flat panels, and finally submerge the board section by section if the soap found nothing.
- Mark every bubble with a pencil before you dry the board, because a dry pinhole is invisible again.
Our valve adapter overview shows which wrench fits which valve, and if the board turns out to be sound, the pressure loss may simply be the pump: the pump comparison lists which ones actually reach the pressure printed on the board.
What a Repair Costs Against a New Board
A patch kit and a tube of vinyl cement cost a fraction of a board, and both keep for years. A professional seam repair on an inflatable, on the other hand, often lands close to half the price of a mid-range board, which is why brands tend to replace rather than repair inside the warranty period. Before you pay for either, check what you paid for the board in the first place: our piece on why paddle boards cost what they do explains where the money goes. Storing the board properly is cheaper than both, and how to store a paddleboard covers the damage you can simply avoid.
Finishing and Post-Repair Care

Once you have addressed the damage to your paddle board, it’s crucial to ensure that the repairs are properly sealed and cured.
Following that, regular maintenance can help prevent future issues, safeguarding your investment for years of enjoyment on the water.
Proper Curing and Sealing
After repairing your paddle board, it is essential that you allow adequate time for the repair materials to cure properly.
If you’ve used a product like Solarez, follow the manufacturer’s instructions closely, usually involving exposure to sunlight for curing.
Keep the board out of the water and avoid direct sunlight during the initial setting period, as UV light speeds up the curing process, but excessive heat can cause issues.
For sealing, use a quality marine-grade sealant applied with clean paintbrushes, ensuring all seams and edges are smooth to avoid water ingress.
- Cure Time: Generally 3-24 hours, depending on the repair product.
- Sealing Tools: Paintbrushes and marine-grade sealant.
Maintenance Tips to Prevent Future Damage

Regular maintenance is critical to extend the life of your paddle board and reduce the likelihood of further repairs.
Always rinse your board with soapy water to remove salt and debris post-use, and use rub cloths to gently dry the surface.
Store your board out of direct sunlight and heat to prevent delamination or bubbles from forming:
- Rinse with soapy water after each use.
- Dry thoroughly with soft cloths.
- Store in a cool, shaded area away from sunlight and heat.
Inspect valves and seals regularly for signs of wear and ensure they’re tight and not leaking.
Use rubbing alcohol to clean any tough spots on the board, but avoid abrasive materials that might damage the surface.
Lastly, keep track of your board’s warranty, as some repairs might be covered by the manufacturer.
Consistent care and maintenance after repairs ensure your paddle board remains in peak condition for all your adventures.
Professional Repair and Warranty Considerations
When your paddle board incurs damage, knowing when to seek professional repair and understanding your warranty can save you time and money.
Expert repair services can address issues beyond the scope of typical paddle board repair kits, ensuring your stand up paddle board remains in top condition.
When to Consult a Professional
If you encounter significant damage such as a deep gash or a large puncture on your paddle board, it’s imperative to consult a professional.
They have the tools and expertise to perform complex repairs, especially those requiring internal work or precision.
Structural damage on hard boards or seam tears in an inflatable paddle board may also necessitate professional repair to guarantee a safe and lasting solution.
For damage likely to impact the performance of your paddle board, such as problems with the fin system that affect stability and tracking, professional assessment is advised.
They can determine whether you need a simple fix or more extensive restoration work.
Understanding Warranty and Insurance
Most paddle boards come with a warranty that covers manufacturer defects and, in some cases, extends to certain types of damage.
Examine your warranty details closely, as some may require repairs to be conducted by authorized professionals to remain valid.
Keep a copy of your purchase receipt and warranty document, as you’ll often need them when making a claim.
If your paddle board is insured, review your policy to understand what kinds of repairs are covered.
In cases of accidental damage, your insurance might cover the repair cost, less any applicable deductibles.
It is crucial to report the damage promptly and provide any required documentation to ensure a smooth claim process.

FAQ
What type of adhesive should be used for repairing an inflatable SUP?
For inflatable SUPs, it is important to use a specialized adhesive designed for PVC or urethane materials. This type of adhesive ensures a strong bond and water resistance, essential for lasting repairs.
Where can I find professional repair services for inflatable paddle boards?
Professional repair services for inflatable paddle boards can often be found at local water sports shops or marinas. These facilities typically have experienced staff who specialize in SUP and kayak repairs.
What items are typically included in a paddle board repair kit?
A typical paddle board repair kit usually contains a valve spanner, color-matched PVC patches, and sometimes glue or adhesive. These essential items allow for basic maintenance and repair of small issues.
What is the best method for fixing a seam leak on an inflatable paddle board?
To fix a seam leak on an inflatable paddle board, clean the area thoroughly, apply adhesive to both surfaces, press firmly, and allow ample time for the adhesive to cure. For best results, follow the manufacturer’s guidelines closely.
How can I effectively refinish and restore the surface of my paddle board?
Effectively refinishing and restoring the surface of a paddle board involves cleaning the board, sanding the surface gently, and then applying a fresh coat of board varnish or paint. For specific products and techniques, it’s best to consult with a paddle board manufacturer or a professional.
Are there any specific techniques for locating and sealing leaks on a paddle board?
To locate a leak on a paddle board, inflate it fully and listen or feel for escaping air. Subsequently, apply soapy water over the surface and look for bubbles. Once identified, dry the area, apply the appropriate adhesive, and seal it with a patch if necessary.


